


archive for 'how-to'
– nursery transformation: week two –

so far, we have moved the big worktable from the old office into its new home (hiding the flat file underneath), relocated gub’s fabric collection and moved the old card catalogue. we also set up ryan’s record collection in the living room.
getting the nursery emptied out was great! except we now have our prized 50s sectional sofa in there, which needs to be sold before we can paint. (anyone interested?) but we did buy some fabric to make a new shade for the window and we’re close to selecting a paint color.
– gub & ryan
check out our week 1 nursery post!
 |
| |
|


date of post: March 6th, 2011 | category: baby, design, house, how-to, nursery
tags: baby, design, diy, house, how-to, nursery, photography, ryan & gub
comments: 4
– nursery transformation: week one – “before” –
 - photo by: ryan sterritt")
in order to make room for our expanding family, we are turning our old office / work room / studio into the new baby’s room. since both sets of grandparents live out of town, we opted to keep our only guest bedroom in tact so they can come visit. we are playing a bit of “musical rooms” and turning what we used to refer to as “the media room,” which houses our movies, ryan’s huge record collection, and our flat file into the new work room and studio. we are setting up ryan’s office in the guest bedroom.
here’s what everything looked like before this transformation began…
– gub & ryan
|
| |
|


date of post: February 27th, 2011 | category: baby, design, house, how-to, nursery
tags: baby, design, diy, house, how-to, nursery, photography, ryan & gub
comments: 11
– bottle rocket brewing –

once upon a time, my buddy willy and i brewed quite a bit of beer under the name bottle rocket brewing. we hosted gatherings where we grilled out and shared our beer with friends. summertime favorites were our watermelon wheat and orange cream ale, both went quickly when we had them on tap.
most of our friends also chipped in and designed labels for our beers. the labels were a big part of the fun we had! you can see all of the different label designs on the bottle rocket website, or flip through them here.
although it’s been awhile since i’ve brewed, i hope to get back to brewing soon!
– ryan
|
| |
|


date of post: February 25th, 2011 | category: beer, brewing, handmade, how-to
tags: beer, brewing, handmade, homebrew, photography, ryan
comments: none
– reuse your growlers –

have any growlers from a brewpub or other large bottles sitting around your house? try filling them with various vinegars or cleaning products like bleach to get more use out of them! we had a few empty ones taking up space in our kitchen so we decided to find another purpose for these cool bottles. our growlers were just collecting dust anyways since georgia doesn’t allow brewpubs to refill them. lame.
– ryan & gub
date of post: February 6th, 2011 | category: design, how-to, reuse
tags: design, diy, how-to, reuse, ryan & gub
comments: none
– life of a melon –

we picked our first ripe cantaloupe and it was amazing! as a tribute, we gathered photos to show the life of our melon.
fyi, we learned that you can tell if a cantaloupe is ripe by lightly thumping where the stem meets the navel of the melon. if the stem easily breaks off, it’s ready!
– ryan & gub
|
| |
|


date of post: July 23rd, 2010 | category: food, garden, house, how-to, summer, sweets
tags: diy, food, garden, house, how-to, photography, ryan & gub, summer, sweets
comments: 1
– blackberry & cherry cobbler –
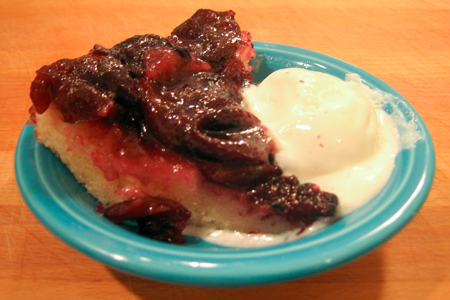
we were able to find lots of yummy fresh blackberries & cherries at the store this week. the blackberries were not super ripe yet and ry was having me try bites of them together with the cherries. the combination of sweet and sour was so good we decided to make a blackberry & cherry cobbler!
we used the basic (add any fruit) cobbler recipe from the first paula deen cookbook & finished with ice cream.
– ryan & gub
blackberry & cherry cobbler recipe:
ingredients:
8 tablespoons (1 stick) butter
2 cups sugar
1 cup water
3/4 cup self-rising flour
3/4 cup milk
2 cups fresh sliced fruit (we used blackberries & cherries)
directions:
– preheat oven to 350 degrees
– put butter in deep baking dish and place in oven to melt
– clean and slice fresh fruit, place in a bowl and sprinkle with some sugar
– add the fruit, 1 cup of water and 1 cup of sugar to a saucepan
– bring to a boil and simmer for 10 minutes, stirring often
– mix 1 cup sugar and flour; add milk slowly to prevent lumping
– pour over melted butter in baking dish, do not stir
– spoon fruit on top, gently pouring syrup, again without stirring
– bake 30 to 45 minutes, batter will rise to top during baking
– serve with vanilla ice cream and/or whipped cream
|
| |
|


date of post: July 10th, 2010 | category: cooking, food, handmade, how-to, recipe, sweets
tags: cooking, food, handmade, how-to, photography, recipe, ryan & gub, sweets
comments: none
– fried green tomatoes –

we made fried green tomato BLTs for dinner last night and they were delicious! we used a tomato from our garden and had sautéed zucchini as a side, which was also from our garden.
to prepare, slice a green tomato and place on a plate or splatter guard. sprinkle salt on top and let the slices sit for a couple of hours. this will cause the water to drain out of the tomatoes for a better frying experience. pour off any excess water as it builds. when ready to fry, just dip a slice in egg wash and batter before frying in oil at medium heat. we used corn meal in our batter, but feel free to use flour.
– ryan & gub
fried green tomato recipe:
ingredients:
1-2 large green tomatoes sliced
bread, mayonnaise, lettuce & bacon (if BLTs are desired)
egg wash:
2 eggs, beaten
1/3 cup milk
batter:
1/2 cup corn meal
1/2 tsp salt
1/2 tsp garlic powder
1/2 tsp onion powder
1 tsp parsley
directions:
– clean tomatoes and slice
– place on a splatter guard and sprinkle with salt, let sit for a couple of hours
– pour off any excess water as it builds
– heat oil in a frying pan at medium heat
– dip tomato slices in egg wash and then in the batter
– gently place battered tomatoes in frying pan and fry until golden brown
– place on splash guard to let cool and drain the oil
– serve on toasted bread with mayonnaise, lettuce and bacon or with a dipping sauce
|
| |
|


date of post: June 22nd, 2010 | category: bacon, cooking, food, garden, handmade, how-to, recipe, summer
tags: bacon, cooking, diy, food, garden, handmade, how-to, photography, recipe, ryan & gub, summer
comments: none
– fried squash blossom –

we recently made some fried squash blossoms from our garden that were delicious! we were getting frustrated over the amount of flowers falling off our plants but it turns out they were male flowers that don’t grow fruit. gub remembered having fried squash blossoms in italy so we found a recipe and did some frying.
to make these tasty treats, first gather and clean some squash flowers. next dip the flowers in egg and batter before frying them up in some oil at medium heat. it’s the same as frying anything, you’ll just want to use a light batter since the flowers are so delicate. we went with corn meal and loved it!
– ryan & gub
fried squash blossom recipe:
ingredients:
fresh squash flowers
whipped cream cheese for stuffing (if desired)
egg wash:
2 eggs, beaten
1/3 cup milk
batter:
1/2 cup corn meal
1/2 tsp salt
1/2 tsp garlic powder
1/2 tsp onion powder
1 tsp parsley
directions:
– clean squash flowers
– stuff squash flowers with a little whipped cream cheese if desired
– heat oil in a frying pan at medium heat
– dip squash flowers into egg wash and then batter
– gently place battered squash flowers in frying pan and fry until golden brown
– place fried flowers on splatter guard to let cool and drain the excess oil
– serve hot
|
| |
|


date of post: June 15th, 2010 | category: cooking, food, garden, handmade, how-to, recipe, spring
tags: cooking, food, garden, handmade, how-to, photography, recipe, ryan & gub, spring
comments: 6
– hydrangea tips –

with our hydrangeas in full bloom, we’ve been keeping fresh flowers throughout the house. the problem is our cut flowers kept wilting after only a few hours, which was very frustrating. we decided to look for a remedy and take action.
here’s what we found worked best for keeping hydrangeas fresh after cutting them from a garden. first, cut the flowers in the early morning when the weather is cool, not in the afternoon heat. be sure to bring a pitcher or bucket of water and place the flowers in the water right after cutting. when ready to arrange, cut the stems at an angle under cold tap water and dip the flower tips into a bottle of alum powder, found in the spice section of most grocery stores. after dipping, place the flowers in a vase filled with water. that’s it.
we’ve used this method numerous times now and it totally works! it’s impressive how much longer our cut hydrangeas last.
– ryan & gub
|
| |
|


date of post: June 10th, 2010 | category: flowers & trees, house, how-to, spring
tags: diy, flowers & trees, house, how-to, photography, ryan & gub, spring
comments: none
– grow gardens –

here is our garden at four weeks.
we planted our cute little garden on the 15th of april, here’s what we are growing:
|
|
|
|

here is our garden at six weeks.
we ended up losing our one artichoke plant early on and replaced it with another much younger tomato plant to try and stagger the tomato harvest a bit.

here is our garden at seven weeks.
everything is thriving pretty well, although something pesky keeps biting off our squash blossoms. they aren’t even eating them, just leaving them on the ground. which is even more annoying. we are working on fencing in the garden and bought some organic insecticide as well, so hopefully we’ll get that under control soon.
– ryan & gub
date of post: June 8th, 2010 | category: garden, house, how-to, photography, spring
tags: garden, house, how-to, photography, ryan & gub, spring
comments: none